Showing posts with label photography. Show all posts

Monday, June 29, 2009

Photography Tip: Give yourself assignments

It seems that sometimes picking up the camera and taking pictures can feel like picking up a 20-ton block when you're not motivated. Motivation can play a key role in helping you to take better pictures. One of my biggest gripes about my childhood photos is that they all seem to be holiday and vacation photos. My family members weren't really motivated to take pictures any other time.

One great way to keep your eyes looking and get good inspiration is to give yourself assignments. My photography students have a tendency to groan when we tell them their "themes" for the day or week. This is probably because they are lazy, but I digress. Giving yourself a theme, such as something like the color red, can really change how you see things. All of the sudden the color red shows up everywhere. Kind of like when you get a new car and all of the sudden you notice that everyone has the same care you do. Experiment with different assignments such as colors, numbers (ie; sets of 3), and other themes of interest to you. Try to start off with something simple. A complicated theme that is too challenging might discourage you at first, so it is better to keep it simple.

If you are looking for some ideas for a theme to take pictures and can't think of any, try one of these:

Letters-go on a nature walk with your camera and see how many letter of the alphabet you can find in nature (such as a branch in the shape of a "Y")

Numbers- Look for sets or groups of things in numbers.

Colors- Pick a favorite color and try to find as many things as you can with that color.

Don't forget to be creative with your theme. This can be a lot of fun too.

Wednesday, May 27, 2009

What is White Balance?


Have you ever taken photos indoors only to look at the photos and find that they all came out orange or sickly-yellow? Or how about a bluish-green? If so, then you've been stricken by the dreaded effect of an incorrect white balance setting.

Just what is white balance? Well, in simplest terms, its how your camera interprets what white is under whatever light condition you have. Many of us do not notice the effects of white balance with our eyes, because our brains are able to decipher what color white is in subtle lighting conditions. Our cameras on the other hand, don't always do this so well. So how do we fix this? Well, fortunately, we have sophisticated cameras with the ability to interpret white if you give it a clue. To do this, you need to find the white balance setting in your camera. sometimes it may be a button and sometimes it may be in your menu of your camera. Usually it is found with initials like "WB" or something similar.

Once you find this setting, you can be given many options. Here are a few of them for you to understand how they affect your photo:

Auto White Balance:
This is what most cameras are set to. For the most part, the camera does a good job. But usually it will struggle under incandescent or fluorescent lighting. This is usually when you need to change it to something more specific.

Incandescent:
This usually has a light-bulb symbol to represent it. It generally will add a blue tint to your photos to help balance the yellowish tint given off by most incandescent lighting, thus getting rid of the yellow color in photos.

Fluorescent:
This will off-set the bluish color of these lights to balance the whites.

Shade or Cloudy:
Symbol that looks like a small house with a triangle next to it or clouds. This will warm up a scene by adding a bit of orange or yellow to it to balance the white. This setting has an extra bonus if you want to add warmth to a photo on an overcast day.

Flash
Attempts to balance out the harsh blue color of your on-camera flash.

My best advice if this seems confusing is to find this setting on your camera (every digital camera has this option somewhere) and switch it to the different choices and observe the differences. Sometimes a little experimenting goes a long way. Even better, once you better understand how white balance works, you can use it to help you make more creative photos as well.

Sunday, May 17, 2009

Photography Tip # 12: Get some direction

Thus far we have looked at 2 main facets of light that are of major concerns to getting good photos. We first looked at quantity, and how we should always consider how much available light we have and how to work around not having enough. Our second consideration was light quality and how we should consider the kind of light we are shooting in, whether it be the light of midday, indoor light, etc. Our last item on the list is Direction.

By being aware of the direction of your light source, you can always use the light to your best advantage. Keep in mind that the sun does move around in the sky. A shot on the beach at 8am is going to look different than a shot on the beach at 12pm, etc. And then there's the question of a beach in Florida or a beach in California. The point here is the direction. If I shoot a picture of a person with the sun behind them, they will most likely be a silhouette. If I shoot a picture of a person with the sun behind me, they might be squinting and grimacing in the shot. In these situations, try to put your subject in a position where the light is still illuminating them (perhaps from the side) but not interfering with ability to see and be comfortable.

Indoors, its always good to utilize natural light, if possible. The most common and favorable indoor light source would be a north-facing window however, I've found that as long as the window is big enough and enough light gets in, then it doesn't matter. The key here is to consider the direction of the light and how it falls on your subject.

This concludes the series on light. The next several posts will concentrate on common "how to" questions that most people have when using their camera.

Wednesday, May 13, 2009

Photography Tip # 11: Quality is your first priority

Okay, so maybe it isn't. But when it comes to light and photography, perhaps it should be. When a photographer talks about the quality of light, what they are usually talking about is the temperature or color of the light. Good quality light is generally a focus of landscape photographers, but it can certainly be used to the advantage of any photographer in making an image.

Good quality light can usually be found naturally from sunsets and sunrises. However, sometimes after a passing storm at the end of the day, you'll find the sky lit up with beautiful orange or pink clouds, which turns everything into a giant glow of warm and comforting colors. The next time this happens, "Get thee thy camera and runneth thyself onward!" Or in other words, go take some pictures. Quality light is worth waiting for, so if you want it, be willing to get out there during the "golden hours", which is the hour or so before dark or after the sunrise.

So what is low-quality light? Well, truthfully, beggars can't be choosers, so if you just want to be able to take photos, all light is your friend. But the worse times of the day to get soft and colorful light would be at night (duh), or during the harsh lighting of midday. This is when the light is the most direct and (blindingly) brightest and colorless.

So the next time you are planning on shooting, keep in mind the quality of the light that you are working with. You might just find that good planning will really pay off.

Tuesday, May 12, 2009

Photography Tip # 10: Quantity is important

I think that because the concept is easy to understand, many people seem to gloss over at the mention of quantity when it comes to light. I mean, it is pretty obvious that you need to be able to see to get the shot you want. However, what people fail to remember is that the camera does see differently than your eyes do.

Our eyes have the amazing ability to adjust itself because of the minuscule adjustment of muscles around our eye which enable it to adapt to available light. Our eyes also can see a broader dynamic range of light than our cameras. Dynamic range is the range of exposure from light to dark. We see more shades of light and dark in one view than the camera does, and sometimes when we take a photo in what we think is enough light, the camera gives us a image or makes an adjustment that surprises us. As you grow more experienced as a photographer, you will start to be more sensitive to the amount of light around you, and know the limits of what your camera can do in certain kinds of light.

I personally enjoy the challenges of different lighting, and use it as a reason to look for creative ways to exploit it in my images. To do this, I recommend learning more about shutter speed and its effects on your photos. Also, experiment with your ISO in different lighting conditions. I recently discovered that the human eye has a maximum ISO rating of about 800. Today's cameras are able to go well beyond 800 ISO, which means that cameras are now able to see more detail in the dark than you can!

Overall, keep in mind that the amount of light is always important and will always affect your photos. If you are stuck indoors, try turning on a few more lamps other lights (if you can) to get more light into a scene (you might want to ask before you do this at someone else' s house). You might also want to move your subjects near a window to get a little bit more ambient light from outside. If you are going somewhere where you know the light will be dim and you are photographing relatively stationary subjects, consider a tripod or something similar to help stabilize your camera so that you can use longer shutter speeds.

In our nex post, we are going to talk a little more about the quality of light, and how it can be used to enhance your shots.

Friday, May 08, 2009

Photography Tip # 9: Pay attention to the light

Almost every experienced photographer can tell you that if you don't pay attention to the light, your photographic experience is likely to be miserable. This is because without light, photography is impossible. In fact, the word photography literally means "light writing" or "light painting".

One of the biggest obstacles to people is to understand that light has both a quality and quantity aspect to it. It also has a direction. In order to progress in your quest to improve as a photographer, you need to understand these things. Let's break them down a little more:

Quantity: This is probably the easiest for people to understand. The more light you have, the easier it is for you and your camera to get a proper exposure. However, sometimes too much light can work against you, depending on the kind of shot you are looking at getting. For instance, a nice creamy blur in a waterfall is very difficult to achieve if you are working with lots of light, because of the risks of the exposure being too bright. It is easy to realize that pictures taken in a dark setting can be complicated and sometimes require light from other ambient sources such as lamps, flashes, etc. We will deal more specifically with tips on handling these situations in future posts.

Quality: This attribute of light is sometimes referred to as temperature or color. Light takes on a different color depending on its source and the time of day. For instance, the sunlight during a sunrise has a more pink or golden color to it, while light during a sunset will typically be more orange or red. Incandescent lights in a home normally give off a yellowish hue, while fluorescent lights can have a green or blueish tint. Back to the time of day, the sunlight during high noon tends to be more harsh and direct, resulting in lots of shadows and contrast. Many photographers try to avoid light in these hours because of the less than flattering effects the light makes.

Direction: Its always important to know where the source of light is coming from when you take your shot. Ignoring such things will end up leaving you with unexpected silhouettes of people or harsh and distracting shadows which would draw attention away from your subject. The best way to actively practice with this concept is when taking photos outside, pay attention to where the sun is in the sky. By taking note of the giant light source in the sky and also your subject's location, you will be best prepared for how to set up your shot to look the best based on this knowledge.

This post is really meant to be an introductory tip on light. There have actually been whole books published on this subject alone. The next several posts in this blog will focus on the tips in using light to your advantage in taking various kinds of photos.

Saturday, May 02, 2009

Reader Feedback, and why I need your input.

One of the things that I appreciate most from blogging is the opportunity to get reader feedback on either my ideas, how I'm doing, how much I stink at it (okay, maybe I don't appreciate all the feedback), etc. The last post is a good case in point. One of my readers pointed out something I forgot to add concerning Aperture Priority mode. Here's the comment:

"I've really been enjoying your photography posts, great material! One sub-tip on Aperture Priority mode: this is a good option but, like you discussed in the "Shutter Speed" post, remember to keep an eye on the shutter speed. If the light's low, the camera will set the shutter speed too slow and your shots can end up blurry due to camera shake. You can combat this by adjusting your ISO to keep things in an acceptable range.
"

This is a good tip. I'll actually add to it and say that for most cameras, you don't want your shutter speed to get too slow ever without your choice in the matter. There's a general rule that says that whatever your zoom length is, your shutter speed should be similar. Here's an example:

If you are zoomed out to 55 mm on your camera, your shutter speed should be no lower than around 1/50th or 1/60th a second. Anything slower than this might introduce blur because of camera shake. There are other factors to keep in mind, such as cropped sensor cameras, etc. But I won't get into that here. However, I'd like to thank Brock Martin of Infinet Design for the great tip and reminder.

So, as you can see, I value your input. Whether it be a photography tip, a question, or just general feedback. Keep it coming, and thanks for reading!

Tuesday, April 28, 2009

Photography Tip # 7: ISO


So far, I've been probably boring most of my beloved blog readers with more photography geekery than you are willing to handle. Either way, this next tip, if used and understood well, can really help your low-light photography a whole lot.

To review, we have learned that in order to get a good exposure in a photo, we need to balance the choice of aperture (f-stop) number with the shutter speed. To get more light for our exposure, we can choose to choose a wide aperture, such as F/2.8 or slow down our shutter speed. If we were shooting in full manual mode, we would need to depend on both of these adjustments to get our correct exposure.

But what happens when you max out these settings and its still not enough light to get a correct exposure? Let's say I'm shooting an indoor basketball game, and my lens is stopped down as far as it can (say F/3.5) and the shutter speed is as slow as I can make it to stop the action (around 1/500th of a second) and my images are still coming out too dark? Well, to borrow from Apple's iPhone commercial, "There's an app for that.". Okay, not really, but there is a setting. It's called, ISO. ISO, which stands for International Standards Organization (don't ask), is a rating to the amount of sensitivity your sensor has to light. The higher the number, the more sensitive. So an ISO of 200 is less sensitive than an ISO of 800.

In the photography film world, you would buy a film that is rated at a specific ISO. However, in digital photography, we have the option to change this sensitivity on the fly. If my camera is not getting a good exposure due to poor lighting conditions, I can choose to change my camera's ISO sensitivity to get more light. The increased number makes my camera's digital sensor more sensitive to the light, which gives me a better exposure.

It should be noted however, that the trade-off to ISO is digital noise. The higher the ISO number, the more noisy and grainy your images will look. It is generally advised to keep your ISO on your camera to its lowest rating for the best color quality and gradation. However, if you are in a situation where you need more light for the shot, this setting can be a great option. If you do not know where the ISO setting is on your camera, I suggest you read your manual or look for it. Take a few shots at different ISO numbers and check out the results. Some people actually like the look of digital noise in their shots, while others hate it.

To conclude on this nerdy stuff, we have been looking at the 3 elements of exposure, also known as the "exposure triangle" to photographers: aperture, shutter speed, and ISO. All 3 of these settings can make or break your shot. Learning how to use them will almost certainly help to make you a better photographer. That being said, the upcoming posts will focus on some of the modes of your camera and what they do and how I use them.

Wednesday, April 08, 2009

Photography Tip #1 (Continued) DSLR Cameras


The other day we looked at the ever-popular question of "What kind of camera should I buy?". After discussing the pros and cons of point-and-shoot cameras, let's now look at the other option: The DSLR.

DSLR's, or Digital Single Lens Reflex cameras are a digital adaptation of the ever-favorite Single Lens Reflex (SLR) camera that's been around for years. Without going into the geeky-specifics, DSLR's are considered by most to be an advanced camera option. Let's look at some of its strengths and weaknesses:

Pros: Better overall image quality, flexibility of manual controls, typically rugged construction, interchangeable lens options, larger controls and buttons (usually).

Cons: Heavier and bulkier form-factor, more expensive, slow adaptation of common point-and-shoot features such as live view and movie mode.

One thing to keep in mind with the above pros and cons, is that some of those are subjective to the photographer. I personally could care less about some of the movie and live view features, but for others, this might be a big consideration.

DSLR's have been becoming more and more affordable for the casual shooter than ever before. Almost all of the major manufacturers have an entry-level dslr category with a dslr between the 500-700 dollar range. The appeal that most people find in these cameras is their almost instantaneous shutter response. DSLR's use a mechanical shutter which can respond very quickly (fractions of a second) compared to the usual electronic shutter found in most point-and-shoot cameras.

Another appeal to DSLR's is the flexibility to change the lenses. Many point-and-shoot cameras offer a specific range of zoom on the camera. There is usually no way to change it. If you find that your point-and-shoot does not have enough zoom or wide angle, then your only option is to buy a new camera. With a DSLR, you can purchase lenses in any range that you need, and switch them out when you need to.

Some common misconceptions that beginners make with DSLR's is the notion that if its bigger, its got to be better. Not true. In fact, I'd argue that the equipment has nothing to do with taking good photos. I've seen a quote saying that 90% of all cameras are better than 95% of all photographers. The truth in that quote is that good photography doesn't require a professional camera or fancy equipment. It may make the job easier for some, but the real photographer is going to have skill. I've seen people take amazing photos with simple point-and-shoot cameras, while others with thousands of dollars of equipment couldn't take a decent photo to save their life.

So what camera should you buy: The best one that you can afford that will enable you to achieve your goal as a photographer.

Sunday, July 20, 2008

RAW vs JPEG Shooting

Warning: Camera geek post below. If you do not know what either RAW or JPEG is, then you probably should ignore this post.

A few months ago, a friend and I were discussing the tremendous size that RAW files can take up for storage. We were both feeling overwhelmed by the amount of photos we were taking and the amount of demand from our wives (who like to scrapbook) for JPEG files that they need to be able to upload and order them. For both of us, the majority of the reason we shoot in RAW is because of the tremendous flexibility that it gives you for processing the photo later on the computer. Shooting in JPEG allows the camera to do most of the image processing, and leaves you with little room for corrections or changes without degrading the quality of the image. Essentially, if you're going to shoot any images in the JPEG format, you're probably not planning on doing any processing to the photo after you get it on your computer.

We both agreed that it was probably in our best interests to shoot both RAW for our own fine art work, and then JPEG for more informal events such as family get-togethers, etc. This would ensure that we can keep up with our insane amount of storage needed for our photos (JPEG's are smaller than RAW files), and allow us to make the photos our wives would want readily available for their scrapbooking.

So the other day I decided that I would shoot our entire visit to the National Zoo in the JPEG format, which would allow me to shoot more photos (since they take up less space on the memory card), and since I figured that we'd be outside most of the time with good lighting. Needless to say, I was both right and wrong. I only shot about 100 photos (yes, that's not much for me), so even had I shot in RAW, I would have had plenty of room on the memory card. I ran into many situations where the light was less than ideal, and I ended up regretting it when I had to go through my images and try to correct them. Some shots were taken indoors where a flash would have ruined the photo and other settings would have caused me too much blur. Thus, I had to underexpose a few images. Generally, if you shoot in RAW you can lighten the underexposed images enough to fix the photo. JPEG is nowhere near as forgiving. I ended up having to discard several images that were good shots, but too dark in important areas.

On the bright side of this story is that because I was limited in what I could do in JPEG for processing, my processing time on the computer was much shorter, and many of the images came out great without needing much help. In any case, I think that the conclusion is that from now on, I'm going to give up on JPEG shooting unless I have no choice. The lack of control over my post-processing options makes me a little nervous in thinking that that one great image I may one day get might be tanked due a complicated lighting or color issue that could have been easily been adjusted in RAW.

Monday, June 02, 2008

Woops, a wee bit hasty...sorry. :-(

The more I started posting on my new photoblog site, the more I began to feel a little less focused on my art. I started posting more for the sake of getting an image up there, and from it I felt less satisfied with about 50 percent of it. I want my art to have significant meaning to me, and recently, I've been feeling like I have been mass-producing it. For that, I would like to apologize.

I have also been noticing that the new photoblog hosting site degrades the image quality of my images, unless I pay for some sort of "plus" account. After reflecting on it all, I realize that the former photoblog, jurina.wordpress.com allowed me more flexibility and no degradation of my images. Therefore I am going to return to my first location at wordpress, and continue posting there. I have also found a new blog template that is more suitable for photoblogging. I hope you all like it, and again, I apologize for the flip-flopping and any confusion.

Wednesday, April 16, 2008

A Special Request


As my daughter would say: "Okay, here's the deal.". So I am a photography enthusiast. This is probably obvious if you know me or read this blog at all. Part of what I do is try to improve on my skills as much as possible. I take pictures as much as I can. Despite all of my practice and learning, it skids to a dead end if I can't really get any feedback on my images. This is where you all come in. I currently keep a photoblog, where I try to regularly post my better images. Part of the reason I do this is so that I can get feedback on what people like or don't like about these images. Hopefully, with that feedback I can continue to improve how I shoot for both my own enjoyment and perhaps yours as well. So if you have a little time, or if you already subscribe to this blog through an RSS reader or anything, consider also checking out my photoblog too. I'd love to hear your thoughts, whether positive or negative, about my work. Here's the link:

http://jurina.wordpress.com


In the future, I hope to improve the photoblog layout, and, of course, the photography there as well.

BTW, thanks to those few of you who have already been commenting on my photos. Your thoughts are always welcome and have helped me greatly.

Thursday, February 07, 2008

The Picture who?

Several months ago my wife and I took our two kids to get their portraits done at the mall at a place called "The Picture People". I have been there several times before getting pictures of our daughter, etc, but I had never known anything about photography or cameras. That being said, I didn't really have any problems with their photos. They were "ok", however I wasn't the kind of person to question the "professional talent" that surely existed there.

Fast-forward to my most recent experience: After engrossing myself in tons of literature on cameras, photography techniques, etc I started wondering about Picture People gear. What kind of cameras did they use? Did they use portrait lenses? How are they making their prints? Armed with this curiosity, I decided to drop some questions on our designated Picture People photographer (PPP) who would be shooting Liam and Audrey. The following is a paraphrased dialog of our conversation:

Me: So what kind of camera do you use here?
PPP: What?
Me: Is that a Canon SLR?
PPP: Uh, I think so. I really don't know.

(At this point I'm shocked. These people charge stupid prices for portraits, and yet they have people taking pictures who can't even tell you what kind of camera they use)

Me: Do you mind if I take a look at it?
PPP: No, go right ahead. (hands me the camera)
Me: Oh, its a Canon 20D with a Tamron Zoom Lens (The exact specs escape me now).
PPP: Oh yeah, our boss uses the newer one. I think that its the Canon 10D?
Me: Oh, do you mean the Canon 40D (which had just come out about 2 months ago)?
PPP: No, I think that its the 10D. Its really really nice, I guess. I don't really know much about the cameras.
Me: (Feeling a little cheated by the fact that this person makes money shooting photos of my kids with gear that she can't identify)Soooo, Do you use Epson printers for your prints?
PPP: Oh, I have no idea. We have this big machine in the back that prints them out. I can show it to you, if you like?
Me: Sure, can I see it? (She leads me behind the counter to the printing room).

What I saw was a huge monster of a machine that looked like it could have pushed out Ford F150's. It was cranking pretty loudly, and I felt kind of weird and nosy, so I stepped out.

Me: Wow, that's a big machine for prints.
PPP: Yeah, it prints them really fast too.
Me: So how large can you print on that thing?
PPP: Oh, I don't know...I can look it up if you'd like.
Me: No, that's fine. I was just curious. Thanks for your help.
PPP: No problem.

Needless to say, the portrait of Liam was stinky. What made it worse was that we were able to choose from about 10 different shots and couldn't find any that we liked. The pose were mediocre and the composition of the photos weren't great either. My feelings were that, with a bed sheet, some good natural light, and one of the Digital photography Class cameras from school, I could definitely do better than this person.

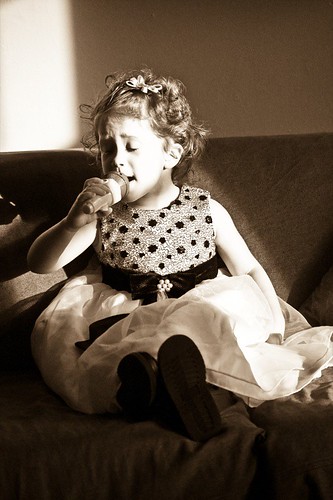
This past Sunday, I had the chance to try out that theory. Below are some shots taken of Audrey in a fancy dress that she got from a friend from church.


20080202-0009.jpg

20080202-0007.jpg

20080202-0005.jpg

20080202-0001.jpg


To be honest, I think that perhaps I just got an airhead of a person at the Picture People. Maybe somebody who just filled a gap for them. On the other hand, it made me wonder how much they actually train their staff if the people can't even identify what camera they use. If they can't do that, then how sure can I be that they even know how to USE the camera?

Tuesday, January 29, 2008

CMOS or CCD? Which is King?


(Nerdy photography technical topic alert! Please skip this post if you don't care about this stuff)


I find it curious to know whether or not it is valuable to go to CMOS over CCD. I've not really gotten a clear message from previous sources on what is the best technology for the digital image. However, I think that the following article does a good job of shedding some light on the subject. Read on if you're curious:

http://www.news.com/8301-13580_3-9860021-39.html?part=rss&subj=news&tag=2547-1_3-0-5

Friday, January 25, 2008

A quick quote for the photography enthusiast.


I was reading a post from Scott Kelby's blog today and he mentioned an ad he saw for the Canon 40D. The photo was of a woman with a sunset behind her with the following words printed on it:

“I gaze at the sunset with the woman I love, and think….f/8 at 1/250.”

To quote Scott Kelby: "You just gotta love that."

Saturday, November 03, 2007

Photography Anyone?

I'm a little crazy when it comes to photography, which is my newfound hobby. Why do I think that am I crazy? Well, first off, I listen to photography podcasts practically every day to and from work in my car. When I'm using the internet at home or at school, I'm usually researching cameras, lenses, or reading photography blogs, tutorials, or viewing photos. I teach a digital photography class at school, and I also manage a flickr page, and a digital photography website (blog) for our newly-formed digital photography club at school. Oh, did I mention that I have my own photoblog where I post my favorite shots? I'm also saving up every little penny I have for a Digital SLR camera of my very own (right now we have a simple point-and-shoot which I feel like I've outgrown months ago). I've also completely read through B&H's 2007 Digital Photography Source Book (a catalog), as well as about 7 different books on photography in the past 6 months. Do I have reason to feel a little nuts? Maybe. However, if you see me snapping photos or hear of my untimely death at the bottom of a cliff with a shattered camera in hand, now you'll completely understand.

Thursday, July 05, 2007

What a Camera Can't Do

My Canon Powershot S2 IS


So I was on my summer vacation with my family and a good friend who enjoys photography like me. We decided to go out and shoot shots at the beach during the evening hours just to practice some low-light photography and see if we can find some interesting compositions.

My friend utilizes a Nikon D70, which is a DSLR camera with some pretty nice features. I'd compare it with a Canon EOS Rebel XT or something along those lines. My camera: Canon Powershot S2 IS...NOT a DSLR, so pretty limited. I didn't think this way at the time. When I had purchased my camera, the idea was to get a camera with good quality, virtually no shutter lag, and lots of room to learn photography and advanced settings. We didn't want something that was "too complex" until we felt that we felt that we've learned more about the more advanced facets of photography. The camera was not disappointing. It has a nice 12x zoom which comes to about 435mm (cropped) 35mm equivalent plus many manual settings and such. Prior to the trip, I believed that, other than the possibility of purchasing different lenses, there wasn't much I was missing. With my ongoing learning of digital photography, I was elated to find that so far, I've been able to apply much of what I've been learning on this camera.

However, then we started shooting. I made some manual adjustments to find that my aperture only closes down as far as F8. This could be very limiting for me in circumstances where I'd like a little more DOF (Depth-of-Field) in my shots. It also limits me when playing with slower shutter speeds. Speaking of which, I can only slow down my shutter to 15 second exposures with no bulb-mode option or anything similar. This clearly took the fun out of my night-shooting. Not that a 15 second exposure is extremely limiting, but it certainly hurts when I'm trying to get shots of lightning or make star-trails. No fun.

However, there was a feature on my camera that I wish that DSLRs would have, and that is the adjustable lcd screen. Because of the flexibility of my screen, I could get some really cool shots without having to contort my body into yoga-like positions. In any event, for a point-and-shoot camera that was half the cost of an entry-level DSLR, I think it holds it own. On the other side, I hate the thought of, with my new knowledge and desire to explore in photography, having a camera that prevents me from exploring other creative options. I suppose that mastering the stuff I can now do will allow me to get the most out of this camera until the time when I can move up to DSLR joy.

Saturday, May 19, 2007

Photography Ethics?


I was just reading an article out of a special edition of National Geographic that I found kind of interesting. The author was talking about digital photography and emphasizing with great effort, the issue of trust. His point was that with digital photography is it very easy to "manipulate" color, contrast, lighting, and other parts of a photo which can "deceive" the viewer. The idea, he says, is to develop a trust with the viewer of your photo. If you attempt to digitally manipulate a photo with an intent to deceive the viewer, then you are entering "treacherous waters". The author then went on to assure that the photographs in National Geographic are in no way enhanced for this reason.

Personally, as a hobbyist in the field, I'd have to say that anything I want to do with my photos to improve them for my own enjoyment is valid. I also think that if I want to enhance a photo in a way that will make my intentions of the shot more clearer to the viewer, there is nothing wrong with that either. Some people are purists in this field. Anybody else have opinions on that? Feel free to leave some comments.